Friday, November 9, 2012

jewelry armoire

A fun, ongoing project I've been working on this year is organizing my jewelry.  I've searched for the perfect jewelry armoire for a long time but I have been disappointed with the lack of compartments, hooks and space they had.  So instead of purchasing one already made, I decided to make my own!

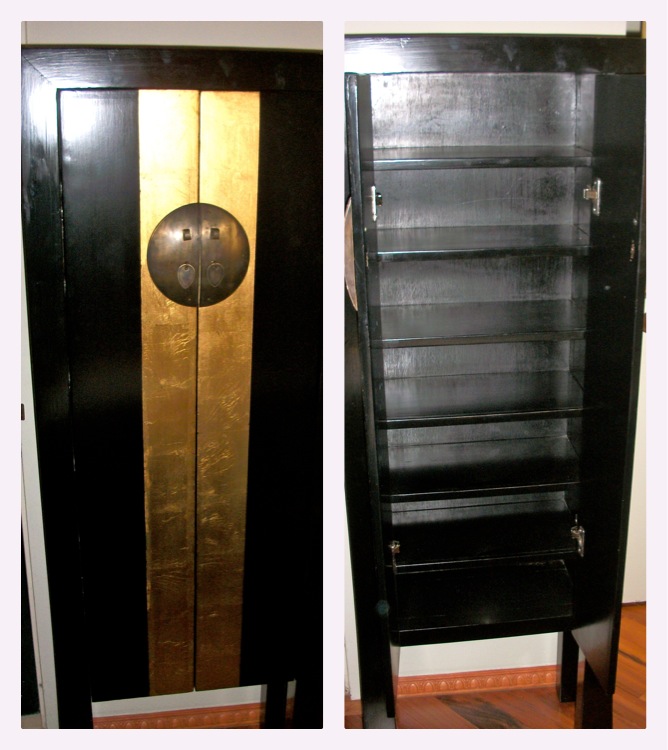
I found this beautiful, tall, armoire with 6 shallow shelves (9"x14") at a local antique shop here in Hawaii.  I love the height, style and exterior design of it.  It also has the ability to be locked, which is a feature I desperately wanted but couldn't find on any other armoire.

The first thing I did was take off the doors and add black velvet to them.  I also took out the top shelf in order to hang necklaces and added black velvet to that area as well.  

Then I added inexpensive gold hooks to the doors as well as inside for necklaces.  And I added gold decorative chain to the doors to hang my dangly earrings from.


I found black velvet lined trays with already made compartments at a local jewelry-making supply store.  I also found black velvet display structures for my bracelets and rings.

The necklace carousels were hard to find.  I located them at a home organizing store and leaped for joy when I spotted them!  They spin and can hold a lot of necklaces.  I have three carousels in the armoire.


Lastly, I added touch lights to the ceilings of some of the shelves.  I plan on adding a few more.  I also want to add drawer slides to the trays to have the ability to slide them out smoothly.  But like I said, this is still a project, but I felt it has come far enough along to be able to share it with you.

The armoire holds 40 necklaces, 36 rings, plenty of bracelets, and has all the compartments I need.  

I hope this inspires you to create one yourself, since I know we all want a beautiful home for all of our lovely treasures!  

Monday, October 8, 2012

crab boil on foil

Host your very own crab boil at home in a very easy way!  This can can get messy, but with proper preparation, don't be afraid to have it indoors or over carpet if you're feeling risky!  lol.


Start by covering your table with foil.  Tape the long pieces together and crunch around the edges so it stays nice and tight.  Cut place mats out of butcher paper but before you tape them down, place a paper towel under each one so it soaks up liquid.  

The cooking part is actually very simple and fast too!
Boil water in large crab pot, add crab boil spice packet (from grocery store).
Place corn on the cob and small russet potatoes in for approx. 5 minutes.
Add Louisiana sausage and shrimp.
A couple minutes later, strain those 4 items out.
Then add Dungenus crab to the same water for 5 minutes.
Pull that out and place in King crab for 5 minutes.  

Dump all items in middle of table and eat with your hands!  

You will also need...

Medium sized scrap bowls- 1 for every 2 people
Melted butter bowls for each person
Lemon slices
Bread or other side dishes
Wet towelettes
Salt/Pepper
Lobster shell cracker
Crab zipper
Seafood fork
Seafood pick

Sunday, September 9, 2012

decoupage hat boxes

So I finally thought of a great idea for all the cards, notes, and letters people have sent me over the years.  I used them to decoupage my hat boxes!  I have been keeping them in a pile for a long time, because their kind words mean so much to me and many of them have beautiful artwork.  My seven hat boxes desperately needed a new look as well, so I ripped, tore, and pasted until they were completely covered.  I also tea stained music paper and decoupaged with that and with old Chinese paper.  All in all, I have a nice eclectic look now and better organization for my hats, scarves, scrap book items, ornaments as well as a home for my wedding ideas! 

Thursday, August 30, 2012

planning from a distance

Bridal Shower


My beautiful friend Cassidy got married recently in Spokane, Washington.  I thought I would share with you how unique her special day was and some planning ideas for her bachelorette party and bridal shower.

I live in Hawaii and wasn’t able to make it to her bridal shower, so I sent a care package ahead of time to her sister’s house, which was where the shower was being held.  I sent my gift (including gift bag and tissue paper), plates, napkins, an icebreaker game and name labels for the drinks.  Her sister was able to wrap the present for me and use the other materials for the event.  To be a part of the fun, the other Maid of Honor (we had two), took her laptop and I Skyped to be included!

I found the template for the bird name cards at
http://dahliawedding.wordpress.com/2010/05/27/a-bird-on-a-wine-glass/

Also, since I had 3 weddings to attend this year, I made Mr. & Mrs. pillows according to each couples' style.  They loved receiving something hand made and unexpected since it wasn't on their registries.

Cassidy and I are in the below picture. 

Bridal Shower care package I sent...


Bachelorette Party

As a Maid of Honor for Cassidy's wedding, I wanted to make her Bachelorette Party really special even though I had to plan it from Hawaii.  I tried not to let the distance deter me from making it unique and still catered toward her personality.  Since the majority of the girls already lived there, I researched to find activities that they hadn't experienced either, so that it was a fresh adventure for us all!  The other bridesmaids were also very helpful and provided resources such as transportation.

First things first...

1. Receive an invitee list from the bride.  This may be more than just the bridesmaids.

2. Determine a date and send a heads up to the invitees.

3. Know your bride!  Research according to her likes and her personality (not every bride wants a "typical" bachelorette party).  Cassidy loves nature, adventure, good conversations as well as dancing the night away.

4. Research the area.  Look for quirky cafes, beautiful views, love inspired monuments/statues and fun tours.  Embrace the location, culture, and cuisine.

5. Finalize the details such as the theme if any, what everyone should wear, transportation, $$.

Here is a play by play of our extremely FUN and ADVENTUROUS Bachelorette Party!  We had a classy, yet hilarious night!

First Stop
Arbor Crest Wine Cellars
Spokane, Washington


Second Stop (Photo Opp)
The Hitching Post
Coeur d'Alene, Idaho


Third Stop
Coeur d'Alene Resort
Sunset Dinner Cruise on the Lake


We finished the night at the Davenport Hotel in Spokane, Washington.


a wedding to remember

My friend's wedding was beautiful with many details.  Located at Mrs. Kalin's Barn in Spokane, Washington, it was the perfect venue, for the perfect wedding, for the perfect couple.

Celebrating Cassidy & Brandon!


Wednesday, August 1, 2012

escort cards & place cards...what's the difference?


Escort Cards-  These are on display near the front entrance of your event to guide or "escort" your guests to their seat.  Traditionally, they show the person's name and table number.  It is convenient to display them alphabetically so it is easy for your guests to find theirs.

Place Cards-  The guests find their table by a large number displayed centrally on each table.  Therefore, only the guest's name needs to be on the place card located at each place setting.

In my experience with events, the traditional escort cards and place cards tend to be a bit redundant and quite formal.  What typically happens is, guests don't always put the escort card in their pocket or purse but rather on the table.  So the table looks messy with the place cards, the central table number and the escort cards all strewn about.  

To conquer this issue, I thought of some ideas to keep the tables looking nice and allow the escort cards to be more interactive.  

The Garden Party

Below, I chose to use fake flowers as the Escort Card.  I wrote the guest's names on the petals and slightly hid the table number to keep it looking clean.  I then baked cupcakes in silicon flower pots and created stem using a straw and added leaves, this becomes the Place Card.  The ladybug is optional if you don't mind where the guests actually sit, as long as they're at the right table.  Once the guests pick their seats, they can place the back of the flower/"escort card" into the straw!  It also becomes dessert!


The Nautical Party

For this theme I put a spin on the regular paper boat.  I made these ones out of wax paper so they can float in water without falling apart.  The paper boat becomes the Escort Card with the name on the front and the table number on the back.  In keeping with the theme, I used a large crab pot as my ocean and filled it with food colored water.  The guests can place their boats in the water once they arrive at their table and voila!-it also becomes a beautiful centerpiece.  The water becomes the Place Card with the boat aiming at each seat.

Share the News Party
For smaller events, tangible escort cards aren’t necessary.  I chose to make an Escort Wall instead, having the guests just memorize their table number.  The Place Cards are newspaper pages.  I suggest reviewing the pages you find just to be sure the content goes with the theme.  I chose cooking pages and added each person’s name.


Tuesday, July 10, 2012

mass printing for envelopes, invitations, labels


This year I attended three beautiful weddings.  Since I am close with all the brides, I tried to help out in any way I could.  I realized during their planning and preparation they were not familiar with MailMerge.  It's an easy way to take a long list of names, addresses, etc., and automatically generate the information onto envelopes, escort cards, invitations and the like.  It is a great way to save money and print from home.  All you need is Word and Excel.

Click below for my video!